MS Word features, Mail Merge, Styles, formatting, Find & Replace, and essential keyboard shortcuts for UPSSSC AGTA.
Mind Map: MS Word & Shortcuts
MS Word — Complete Interface Overview
Microsoft Word is the most widely used word processing software, developed by Microsoft. For the UPSSSC AGTA exam, you need to know its interface, formatting tools, advanced features, and keyboard shortcuts thoroughly.
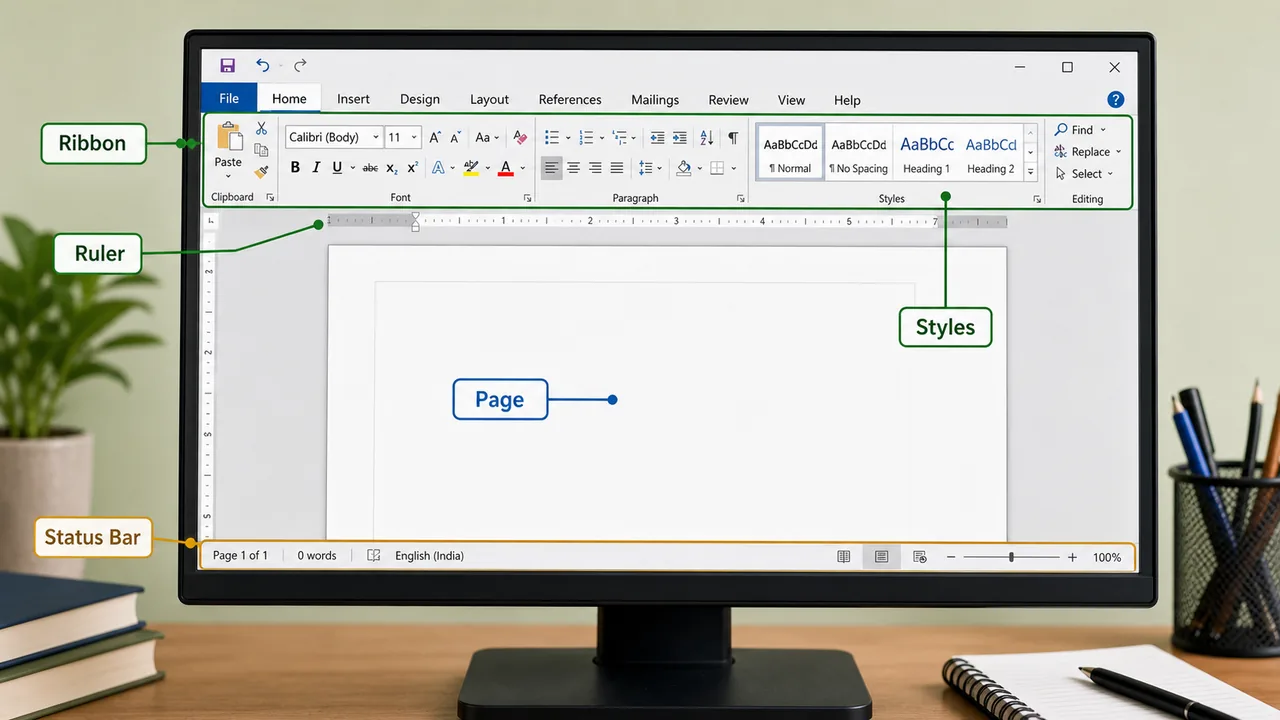
The Ribbon Interface
The Ribbon replaced the older menu-toolbar system starting from MS Office 2007. It organizes all commands into logical tabs.
In older Office versions, commands were arranged through a menu bar and toolbars. A menu bar is the strip that contains items such as File, Edit, View, and Insert. Modern Word emphasizes the Ribbon, but understanding the older menu-bar layout helps when comparing Office versions.
Tab
Key Tools
Home
Clipboard (Cut/Copy/Paste), Font (Bold/Italic/Underline/Size/Color), Paragraph (Alignment/Bullets/Numbering/Spacing), Styles, Editing (Find/Replace)
Quick Access Toolbar — customizable bar above the Ribbon (Save, Undo, Redo by default)
Status Bar — bottom bar showing page number, word count, language, zoom slider
Ruler — shows margins, indents, and tab stops
Scroll Bar — vertical or horizontal bar used to move through the document without changing the content itself
The interface view links common exam terms such as Ribbon, Ruler, Styles, page area, and Status Bar to their screen positions.
Document Formatting — Deep Dive
Font (Character) Formatting
Feature
Details
Font Face
Default is Calibri (since Office 2007). Older default was Times New Roman
Font Size
Measured in points (pt). Default = 11pt. 1 inch = 72 points
Bold
Ctrl+B — makes text thicker
Italic
Ctrl+I — slants text right
Underline
Ctrl+U — line below text
Strikethrough
Line through middle of text
Subscript
Ctrl+= (H₂O)
Superscript
Ctrl+Shift+= (x²)
Change Case
Shift+F3 — toggles between UPPERCASE, lowercase, Title Case
Increase Font
Ctrl+Shift+>
Decrease Font
Ctrl+Shift+<
Paragraph Formatting
Feature
Shortcut
Details
Left Align
Ctrl+L
Text aligned to left margin (default)
Center Align
Ctrl+E
Text centered on page
Right Align
Ctrl+R
Text aligned to right margin
Justify
Ctrl+J
Text stretched to fill both margins evenly
Line Spacing
—
Space between lines: 1.0, 1.15 (default), 1.5, 2.0
Indentation
—
First Line indent, Hanging indent, Left/Right indent
Bullets
—
Unordered lists (dots, squares, arrows)
Numbering
—
Ordered lists (1,2,3 or a,b,c or I,II,III)
Styles — Consistent Formatting
Styles are predefined sets of formatting that apply font, size, color, and spacing in one click. They ensure consistent appearance throughout a document.
Style
Typical Use
Normal
Body text (default paragraph style)
Heading 1
Main chapter/section headings (largest)
Heading 2
Sub-section headings
Heading 3–6
Further sub-divisions
Title
Document title
Subtitle
Document subtitle
Why Styles matter:
Required for automatic Table of Contents — Word uses Heading styles to generate TOC
Enable Navigation Pane browsing (View tab)
Ensure uniform formatting across long documents
Mail Merge — Bulk Personalized Documents
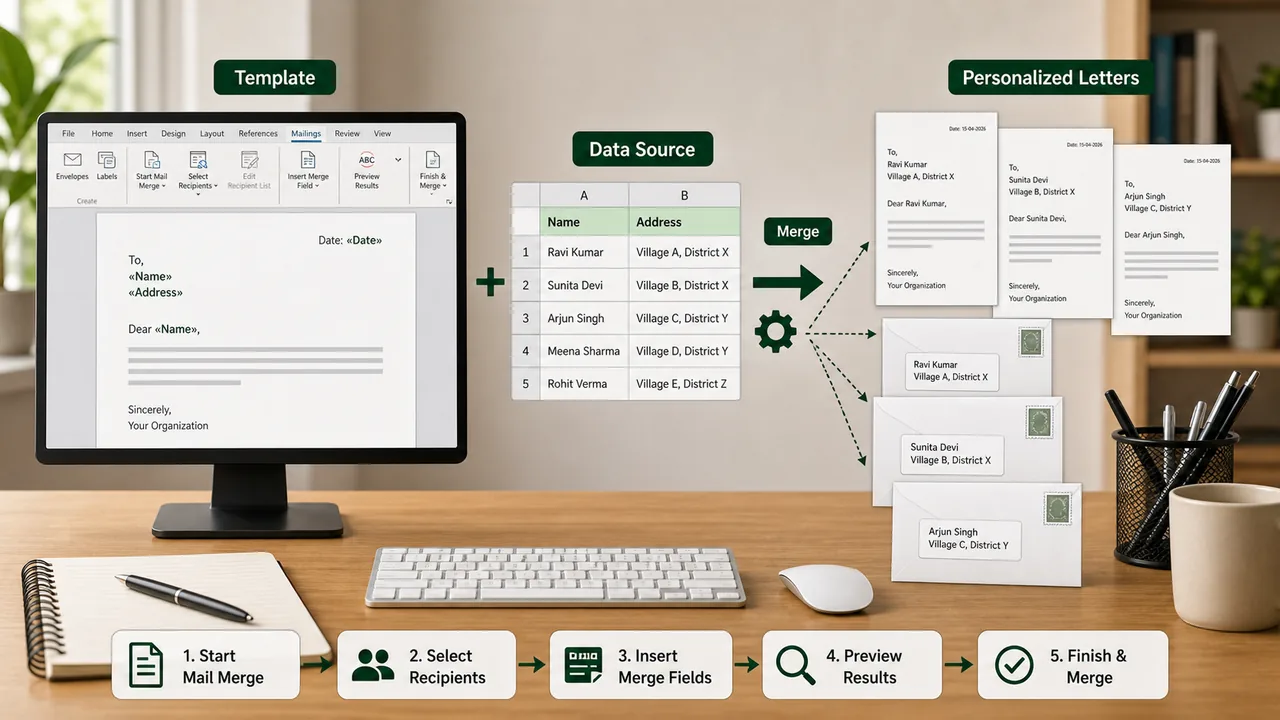
Mail Merge creates multiple personalized copies of a document by combining a main template with a data source. Used for mass letters, certificates, envelopes, labels, and emails.
Mail Merge Steps (5 Steps)
Step
Action
1. Start Mail Merge
Choose document type — Letters, Envelopes, Labels, Email Messages
2. Select Recipients
Connect to data source — Excel file, Access database, CSV, or type new list
3. Insert Merge Fields
Place field placeholders like «Name», «Address», «Amount» in the template
4. Preview Results
Check how each recipient's document will look
5. Finish & Merge
Print documents, create individual files, or send as email
Data source = the file containing all recipient details (names, addresses, etc.)
Each row in data source = one personalized document
Located under the Mailings tab
Mail Merge combines one template with a recipient data source to produce many personalized letters or envelopes.
Find & Replace
Find (Ctrl+F) locates specific text in the document. Find & Replace (Ctrl+H) finds text and replaces it with something else throughout the entire document.
Wildcards — use ? for single character, * for multiple characters in advanced search
Special characters — can find paragraph marks (^p), tab characters (^t), line breaks (^l)
Format search — find text with specific formatting (bold, font, color)
Go To (Ctrl+G or F5) — jump to a specific page, section, line, or bookmark
Advanced Features
Headers, Footers & Page Numbers
Header — text at top of every page (document title, chapter name)
Footer — text at bottom of every page (page numbers, date, author)
Insert tab → Header & Footer group
Can set different first page or odd/even page headers
Automatically fixes common spelling/typing mistakes while you type
WYSIWYG
"What You See Is What You Get" — the screen view closely matches the printed output
Legacy office products such as Lotus Word Pro belong to the older Lotus/IBM office-suite era. It was a word processor, so it fits in the same broad category as document-writing software rather than spreadsheets or presentation tools.
Saving Formats
Format
Extension
Description
Word Document
.docx
Default modern format (XML-based)
Word 97-2003
.doc
Older compatible format
PDF
.pdf
Portable Document Format (non-editable, universal)
Rich Text
.rtf
Formatted text readable by most word processors
Plain Text
.txt
Unformatted text only
Web Page
.html
For displaying in web browsers
Keyboard Shortcuts — Complete Reference
This section is critical for the exam — 4 questions typically come from keyboard shortcuts alone.
General Shortcuts
Shortcut
Function
Ctrl+C
Copy selected text/object
Ctrl+V
Paste
Ctrl+X
Cut (move)
Ctrl+Z
Undo last action
Ctrl+Y
Redo (repeat last action)
Ctrl+A
Select All
Ctrl+D
Open Font dialog box
Delete
Delete character to the right
Backspace
Delete character to the left
Ctrl+F3
Cut selected text to the Spike for collecting multiple items
The Spike is a special Office feature that stores multiple cut items together so you can later paste them in one place. It is not used as often in everyday work now, but it still appears in older shortcut-based questions.
File Shortcuts
Shortcut
Function
Ctrl+S
Save document
Ctrl+O
Open existing document
Ctrl+N
Create new blank document
Ctrl+P
Print
Ctrl+W
Close current document
F12
Save As (save with new name/location)
Formatting Shortcuts
Shortcut
Function
Ctrl+B
Bold
Ctrl+I
Italic
Ctrl+U
Underline
Ctrl+E
Center align
Ctrl+L
Left align
Ctrl+R
Right align
Ctrl+J
Justify
Ctrl+Shift+>
Increase font size
Ctrl+Shift+<
Decrease font size
Shift+F3
Change case (upper/lower/title)
Navigation Shortcuts
Shortcut
Function
Ctrl+Home
Go to beginning of document
Ctrl+End
Go to end of document
Ctrl+F
Find text
Ctrl+H
Find & Replace
Ctrl+G / F5
Go To (specific page/line)
Page Up/Down
Scroll one screen up/down
Function Keys
Key
Function
F1
Open Help
F5
Go To dialog (same as Ctrl+G)
F7
Spelling & Grammar check
F12
Save As
Windows General Shortcuts (Not Word-specific)
Shortcut
Function
Windows+L
Lock the computer
Windows+D
Show/hide desktop
Windows+E
Open File Explorer
Alt+Tab
Switch between open applications
Alt+F4
Close current application
PrtScn (Print Screen)
Take screenshot of entire screen
Alt+PrtScn
Screenshot of active window only
Windows+R
Open Run dialog
Ctrl+Alt+Delete
Security options (Task Manager, Lock, Sign Out)
Windows+Tab
Task View (virtual desktops)
Classic Editor and Navigation Shortcuts
These older menu-bar and text-navigation shortcuts still appear in banking and government computer-awareness MCQs because they work across many Windows applications and editors:
Shortcut
Function
Alt+F
Open the File menu in classic applications
Alt+E
Open the Edit menu in classic applications
Ctrl+Insert
Copy selected item
Shift+Insert
Paste copied item
Shift+Delete
Permanently delete selected item
Home
Move to beginning of current line
End
Move to end of current line
Ctrl+Left Arrow
Move one word to the left
Ctrl+Right Arrow
Move one word to the right
Shift+Home
Select from cursor to beginning of line
Shift+End
Select from cursor to end of line
Additional File Formats
Format
Extension
Description
OpenDocument
.odt
Open-source format (LibreOffice, Google Docs compatible)
Macro-Enabled
.docm
Word document with VBA macros
Macro — Automation in Word
A Macro is a recorded sequence of actions (keystrokes, commands) that can be replayed to automate repetitive tasks.
Record Macro: View tab → Macros → Record Macro
Macros are written in VBA (Visual Basic for Applications)
Documents with macros must be saved as .docm (macro-enabled format)
Security risk: macros can contain malicious code — Word shows a security warning when opening .docm files
Section Break vs Page Break
Feature
Page Break
Section Break
Purpose
Starts content on a new page
Divides document into sections with different formatting
Use Case
New chapter on next page
Different headers/footers, margins, orientation, or columns within the same document
Insert
Ctrl+Enter or Insert → Page Break
Layout → Breaks → Section Breaks
Types
Only one type
Next Page, Continuous, Even Page, Odd Page
Example: Using a section break, you can have portrait orientation for text pages and landscape orientation for a wide table — in the same document.